.png?width=46&height=30&name=Logo-symbol%20(1).png)
A training path links several pieces of content (courses, assessments, documents, links, events, videos, SCORM packages, Coach Expert) organised into sections. This article describes how to create one, from the home page to access and validation conditions.
Table of contents
- Create the training path
- Set up the home page
- Organise the training path into sections
- Add steps
- Control access to sections and steps
- Complete steps and calculate mastery
- End of training path and certificate
- Go further
- Frequently asked questions
Create the training path
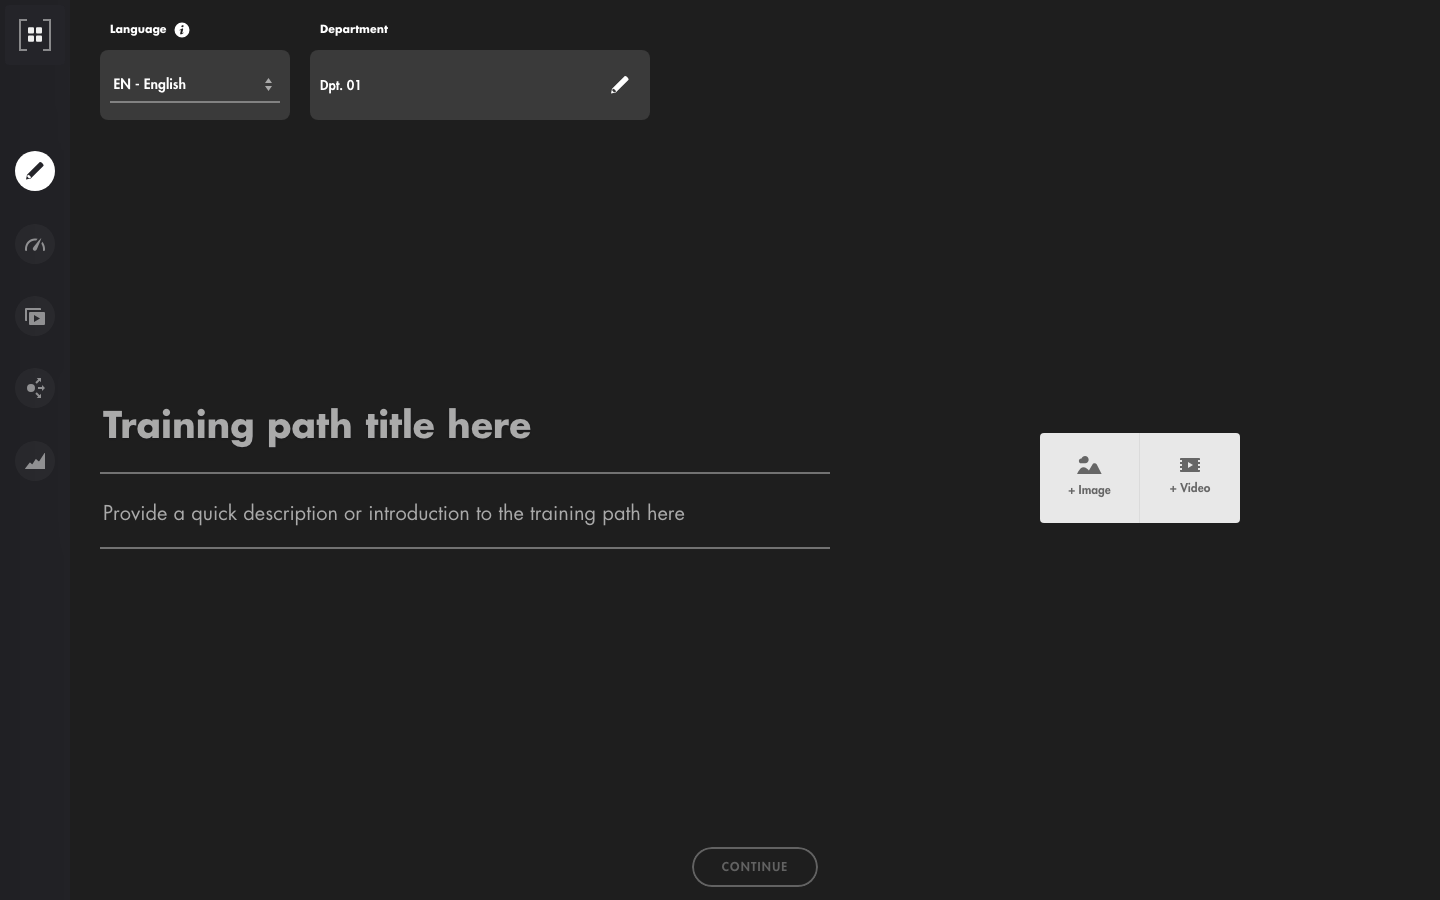
- In your studio, click “NEW ACTIVITY”.
- Select “Training path”, then click “CREATE”.
- Choose the training path's “Language”. It cannot be changed afterwards.
- If departments are enabled on your account, choose the “Department”.
- Enter the title and, if you wish, a short description. Add an image or a video with “+ Image” or “+ Video”.
- Click “CONTINUE”.
Click on the image to open it in a new tab.
Set up the home page
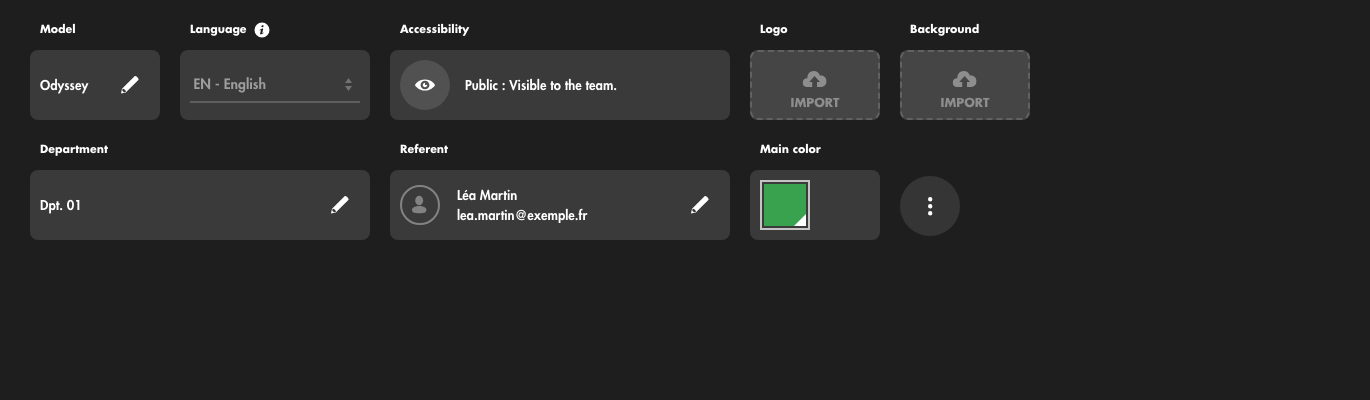
After “CONTINUE”, the top of the page shows the training path's settings:
- “Model”: how the training path looks (Odyssey by default). See Understand the different training path models;
- “Accessibility”: click to switch between “Public : Visible to the team.” and “Private : Only visible to you and administrators”;
- “Logo” and “Background”: upload your images;
- “Referent”: the person learners can contact. In the “TRAINING REFERENT” window, add a photo, the “Last and First name” and a “Means of contact”. The referent is displayed on the learner side with all models;
- “Main color”: applied on the learner side with the Odyssey model only.
Organise the training path into sections
A first section is created automatically. Click “ADD STEPS” to scroll down to the sections.
- Give each section a title (“Section title here”) and, if needed, a description and an image (“+ IMAGE”);
- add a section with “Add a section”, in the list on the left;
- delete the last section with “DELETE THIS SECTION”;
- with the Odyssey model, choose each section's “Display for the learner”: “Free mode (tiles)” or “Linear mode (step by step)”.
Add steps
In a section, click “Add a step”, then choose the type: “Teach Up Module”, “Document”, “External link”, “Event”, “Video”, “SCORM file” or “Coach Expert”. Fill in the panel that opens, then click “OK”. Each type is detailed in Steps to include in a training path.
Move a step
- Within the same section: click the ⋮⋮ handle to the left of the step, hold the click, drag the step to the desired position, then release.
- To another section: click the three dots ⋮ to the right of the step, then “Move to…” and choose the section. The step is placed at the end of that section: drag it to the right position if needed. This option only appears when the training path has several sections.
The move is saved automatically: the icon at the top left turns into a floppy disk while saving, then back into a tick.
Control access to sections and steps
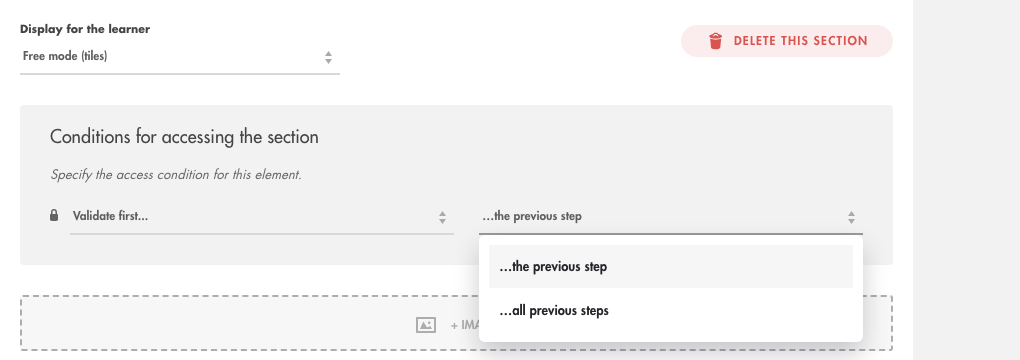
- For a section, from the second one: the “Conditions for accessing the section” block, at the top of the section;
- For a step: “Conditions of access”, in the “ADVANCED OPTIONS” of the step panel (except for an event, which has none).
The choices are the same:
- “Always accessible” (default): no condition;
- “Validate first...”, then “…the previous step” or “…all previous steps”: the learner must first complete the step just before, or all the previous steps;
- “From…”: available from a given date;
- “Until…”: available until a given date.
Click on the image to open it in a new tab.
A section or a step has only one access condition.
Complete steps and calculate mastery
Include the step in the mastery calculation
In the advanced options, “Include the step in the calculation of the total mastery” makes the step count in the training path's mastery. Only Teach Up modules (including assessments) and SCORM packages provide mastery. For a SCORM package, the option is on by default.
Choose the validation condition
The “Validation condition” defines when the step is completed:
- course: “The learner has finished the activity”;
- assessment: your choice, “The learner has finished the activity” (whatever the score) or “The learner has reached the minimum success threshold”;
- document: “The learner has downloaded the file” (one file is enough);
- external link: “The learner has opened the link” (opening the step is enough);
- event: “The learner has confirmed their participation in the event.” (without a date: they turn on “I attended the event”; with a date: they open the step once the event is over);
- video: “The learner has clicked on the video” (opening the step is enough);
- SCORM package: “The learner has finished the activity” (even if the package is failed);
- Coach Expert: “The learner has finished the activity” (opening the Coach Expert is enough).
As long as a step is not completed, it may block access to the following content if that content has a “Validate first...” condition.
End of training path and certificate
In the list on the left, click “END OF COURSE”. The “Download the training certificate” option lets the learner download a PDF certifying that they have finished the training path. See Configure and retrieve the training certificates.
Click on the image to open it in a new tab.
Go further
- Adapt the training path to each learner's level: Configure Macro Adaptive in a training path;
- Choose how it looks: Understand the different training path models;
- Check how it renders before distributing it: Test content on Teach Up.
Frequently asked questions
If a learner has already finished a course, do they have to do it again when this course is added to a training path?
Yes. In a training path, each course has its own progress: a course finished outside the training path is not completed automatically.
Can I set several access conditions on the same step?
No, a step (or a section) has only one access condition. To combine several rules, for example, set a date condition on the section and a “Validate first...” condition on the step.
Can I change a training path's language after creating it?
No, the language is set at creation.
Can I use the image library for the background, as for a course?
No, the image library is only available for courses. For a training path, upload your image with “Background”.