.png?width=46&height=30&name=Logo-symbol%20(1).png)
A form lets you collect information or documents from your learners: feedback on the training, action plan, satisfaction survey, file submission… You build it freely with text, media and answer fields, then retrieve the answers in the dashboard or by email.
Table of contents
- Create a form
- Add fields
- Field types
- Choose how to retrieve forms
- What the learner sees
- Retrieve answers in “Analyze”
- Edit or preview the form
- Frequently asked questions
Create a form
- In the editor of your module or assessment, click “Add” where you want to place the form.
- In the “Create content” bar, open “More”
 .
. - Click “Form”
 .
. - Replace “Form title” with the title of your choice. You can also add a description (optional).
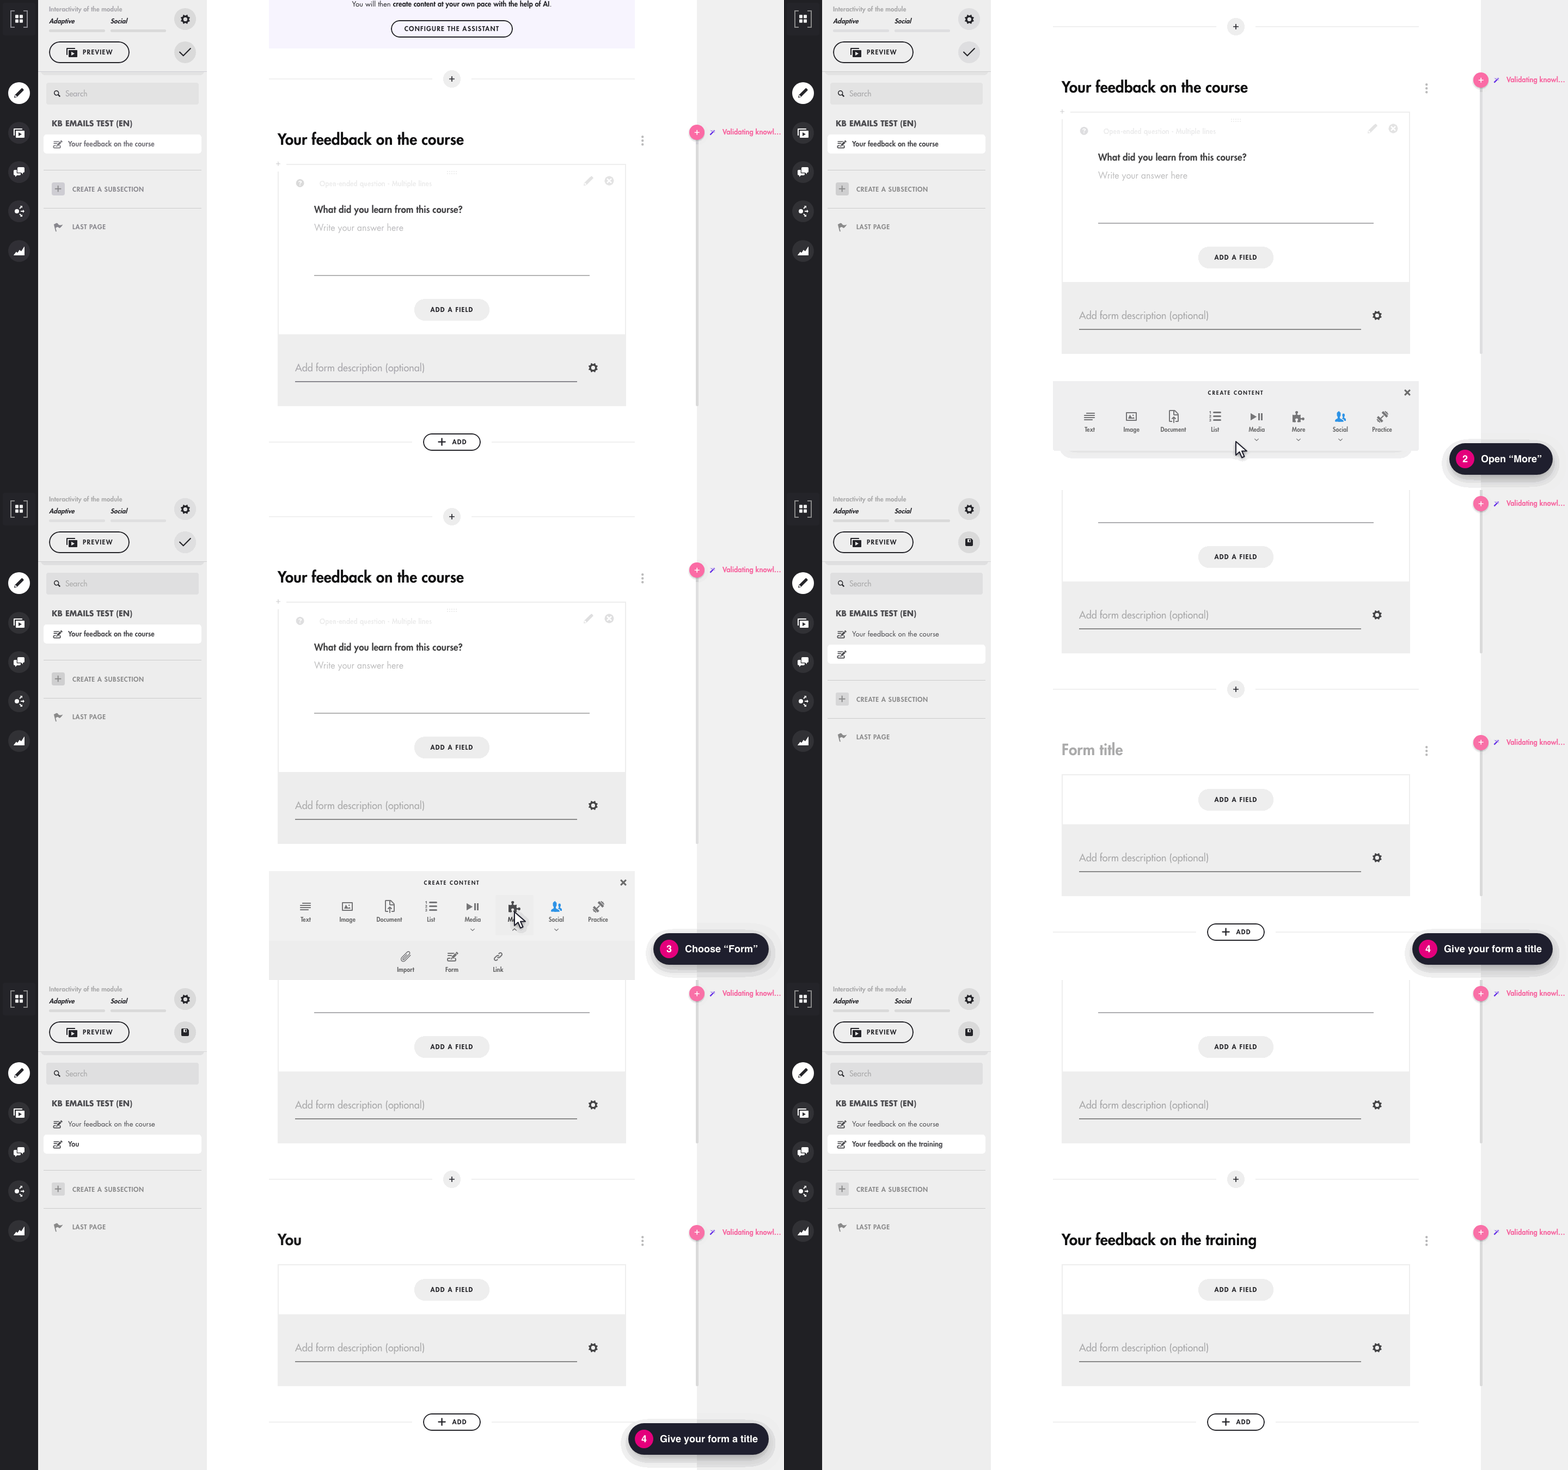
Click on the image to open it in a new tab.
Add fields
- Click “Add a field”.
- Choose the field type (see Field types).
- Write the question or label of the field.
- If needed, tick “Mandatory” and/or “Dashboard” at the top right of the field (see below).
- Click “Confirm”.
You can add as many fields as you need.
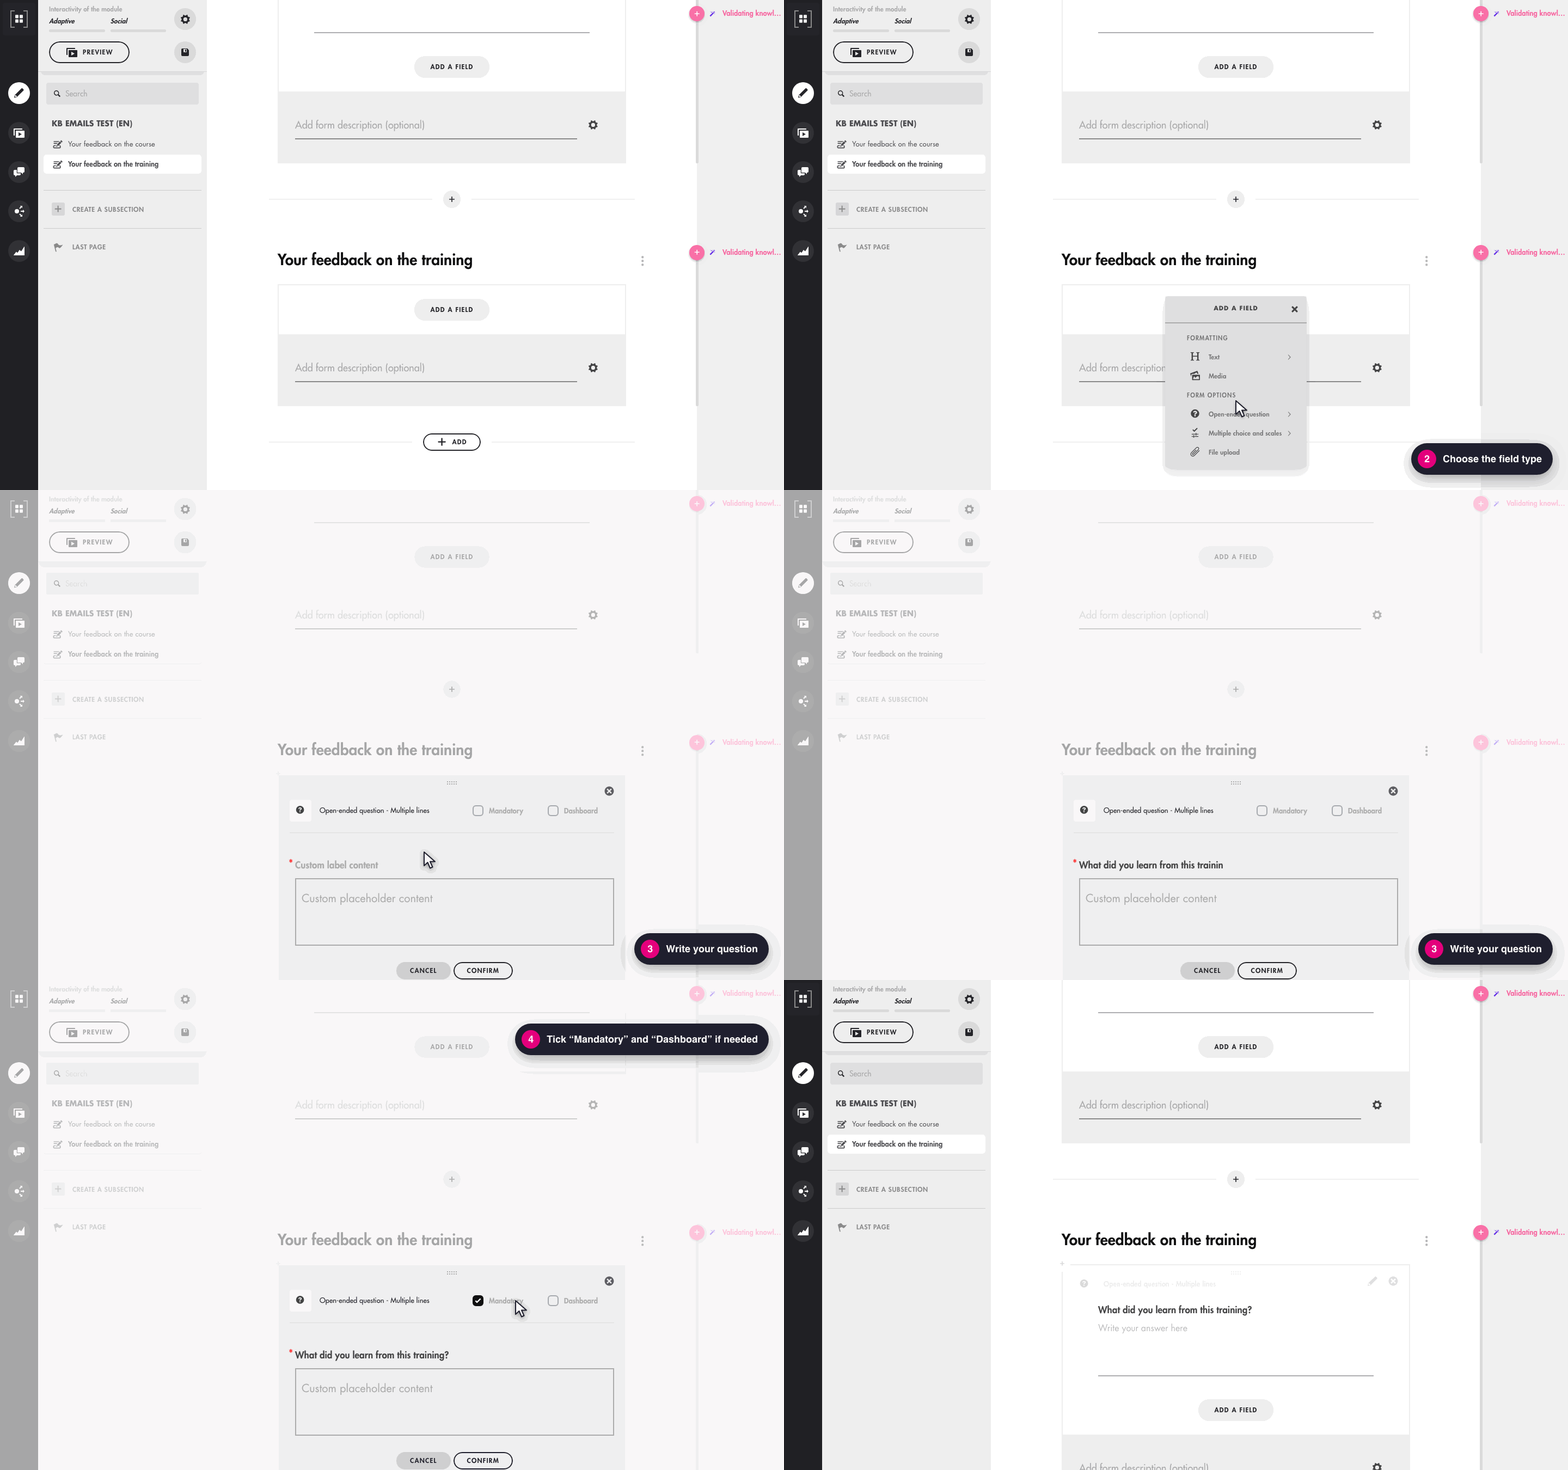
Click on the image to open it in a new tab.
The “Mandatory” and “Dashboard” boxes
- Mandatory: the learner can't submit the form without filling in this field. “(Mandatory)” is shown next to the question. This box doesn't exist for sliders, which always have a default value (see Frequently asked questions).
- Dashboard: the answer to this field appears in the module dashboard and in the Excel export of the results (see Retrieve answers).
💡 Tick “Dashboard” for every answer you want to analyze or compare across learners: you'll find them as columns in the Excel export.
Field types
The “Add a field” menu offers two families of fields: formatting, to present your form, and form options, which the learner answers.
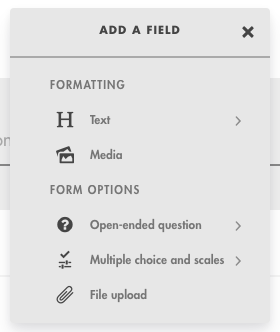
Click on the image to open it in a new tab.
Formatting
- Text: a Title or a Paragraph, to give instructions or structure the form.
- Media: an image to illustrate the form.
Form options
Open-ended question
- Single line: the learner answers on one line (a name, a date, a number…).
- Multiple lines: the learner gets a text area for a longer answer.
The “Custom placeholder content” field lets you pre-fill the answer area with an instruction or an example.
Multiple choice and scales
- Multiple choice: the learner chooses among several options you define.
- Numerical slider scale: the learner moves a slider between a minimum and a maximum value. You set the step (the gap between two values) and can label the minimum and maximum (for example “Not at all” and “Absolutely”).
- Yes or no slider: the learner chooses between two answers.
- Choices in a list: the learner selects an answer from a drop-down list.
File upload
The learner uploads one or more files directly in the form (action plan, proof, deliverable…). By default, all formats are accepted: Word, Excel, PowerPoint, PDF, Image, Audio, Video, CSV, Text and ZIP. Untick the ones you don't want to allow.
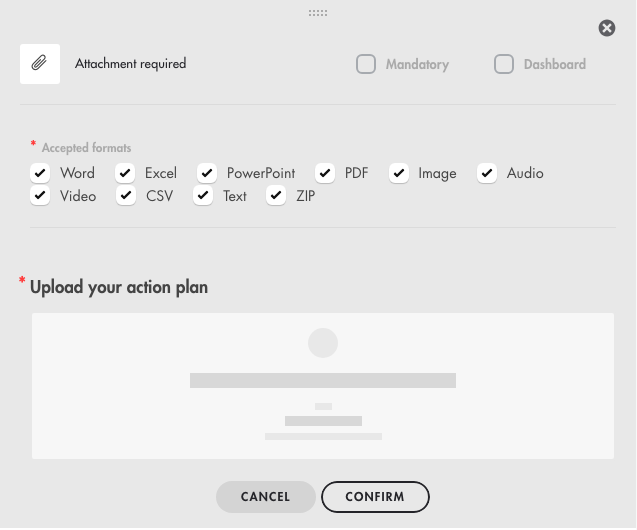
Click on the image to open it in a new tab.
Choose how to retrieve forms
Click the gear icon  at the bottom of the form to open the “Form submission options”. Whatever options you choose, every completed form remains available in the module dashboard (“Analyze” tab).
- Have the form emailed automatically: each submitted form is sent to the addresses you enter (for example the trainer or the manager), with the subject and message of your choice. You can attach one or more media to this email. If no address is entered, no email is sent: the module authors are not notified by default.
- Allow participants to define the recipient(s) of their forms: the learner sees a “Send a copy to the following addresses” field and can send a copy to themselves or to their manager.
- Allow participants to download the forms directly: after submitting, the learner can download their form as a PDF. We recommend enabling this option so they keep a record of their answers.
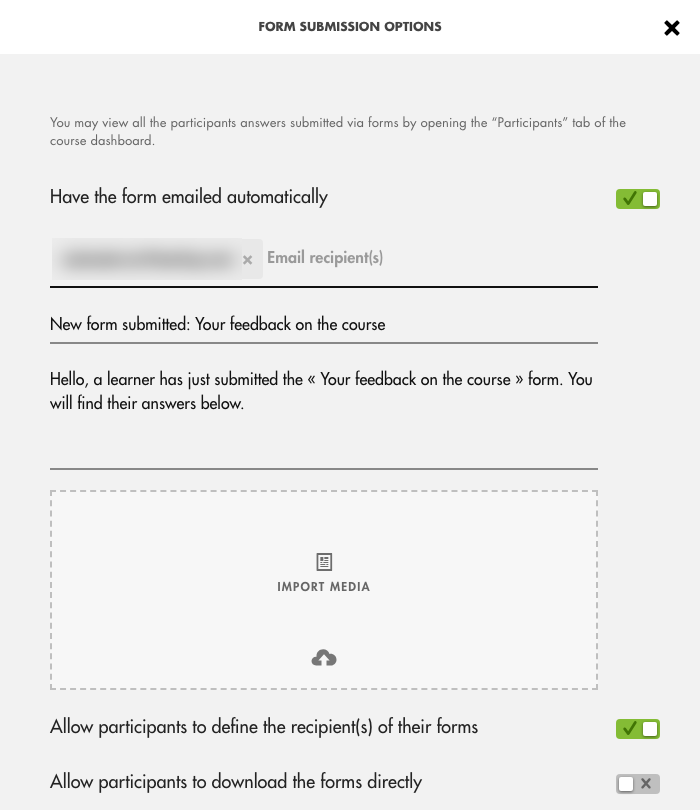
Click on the image to open it in a new tab.
👉 To see what the emails look like, see Emails sent by Teach Up, forms section.
What the learner sees
- In the module, the learner sees the form title and clicks “Answer”.
- A window opens with all the fields. Mandatory fields are marked “(Mandatory)”.
- If allowed, they can enter addresses in “Send a copy to the following addresses”.
- They click “Confirm”.
- The form then shows its submission date. The learner can open it again with “See again” and, if the option is enabled, download it as a PDF.
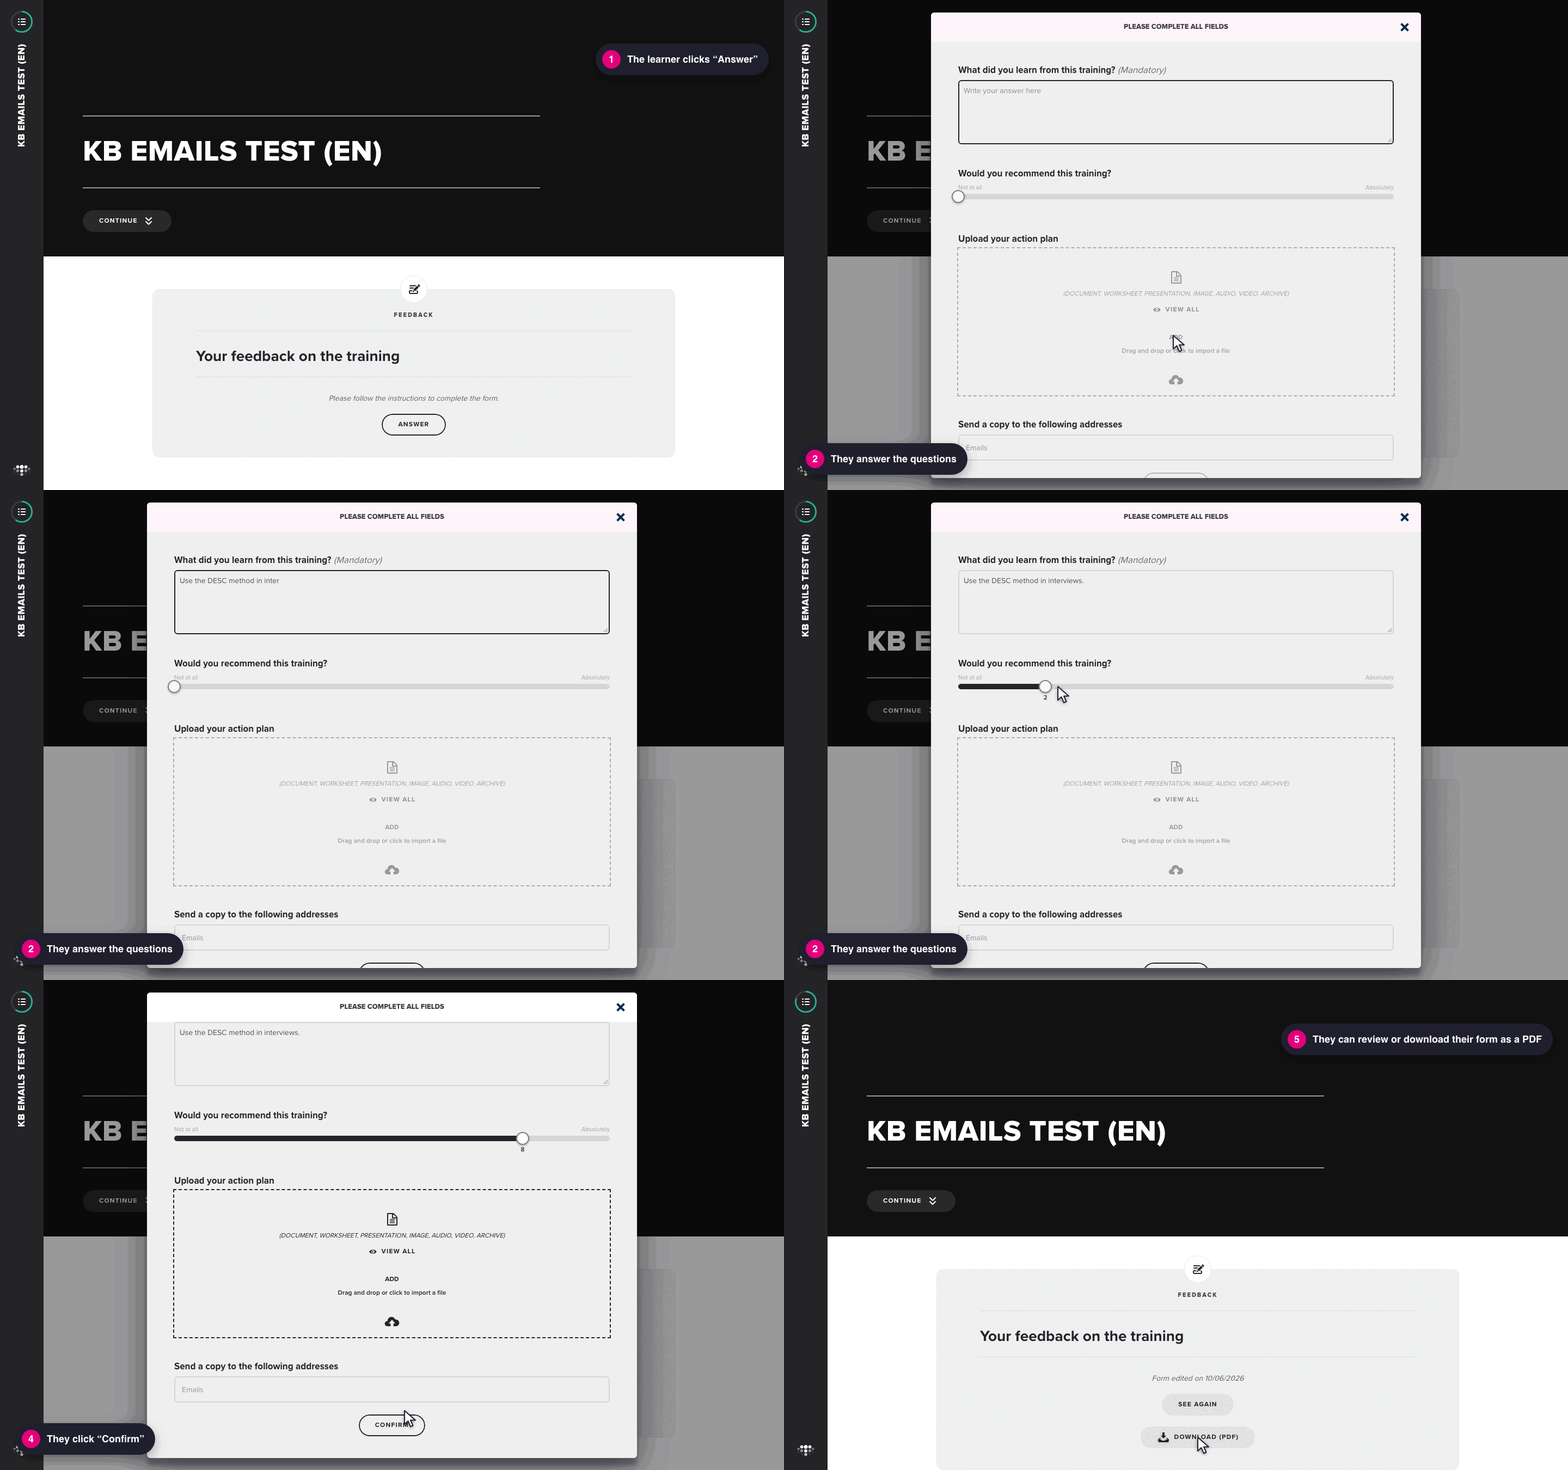
Click on the image to open it in a new tab.
Retrieve answers in “Analyze”
All answers are gathered in the module's “Analyze”  tab, “Participants” list. Depending on your needs, you can retrieve one learner's form, several learners' forms, or all the answers in a spreadsheet.
One learner's form (PDF)
- Click the learner's row to expand it.
- Under “Document”, click the file whose name contains “form”: the PDF downloads.
The “Download all (.ZIP)” button on the same row retrieves all of the learner's documents at once.
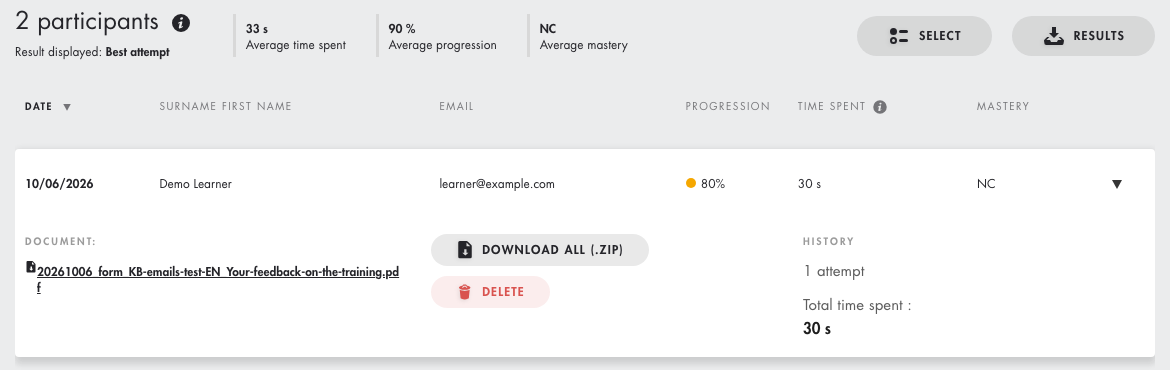
Click on the image to open it in a new tab.
Several learners' forms (ZIP)
- Click “Select”.
- Tick the learners you want, or the box at the top of the list to select them all.
- Click the “Download documents” icon: you get a ZIP file.
- In the ZIP, look for the files whose name contains “form”. Each file name shows the date, the learner, the module and the form title.
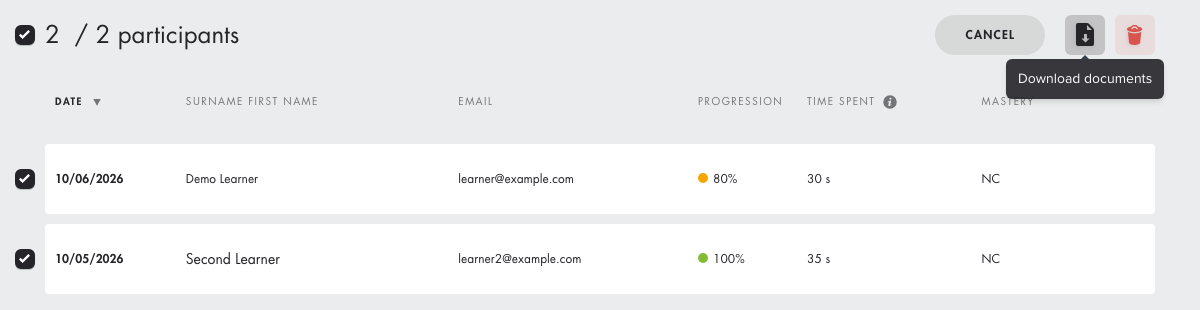
Click on the image to open it in a new tab.
All answers in an Excel file
Click “Results” above the list of participants. The Excel file contains one column for each field whose “Dashboard” box is ticked, giving you an overview of all learners' answers.
⚠️ A field whose “Dashboard” box isn't ticked doesn't appear in the export. If you tick it later, the next export also includes the answers already submitted.
Edit or preview the form
- Edit a field: click the pencil
 to the right of the field.
 - Delete a field: click the cross
 to the right of the field.
 - Reorder fields: drag the field by the dots at the top of its frame.
- Preview the form: click the three dots to the right of the form title, then “Preview this input”. You see it as a learner would, and no data is saved.
Frequently asked questions
Can I ask my learners to send me a document?
Yes. Add a “File upload” field to your form: the learner uploads their file, and you find it in “Analyze”.
Can I add a satisfaction survey or an NPS?
Yes. Add a “Numerical slider scale” field set from 0 to 10 with a step of 1, and tick “Dashboard” to get the scores in the Excel export.
What is the “step” of a numerical slider scale?
It's the gap between two possible values. With a minimum of 0, a maximum of 10 and a step of 2, the learner can only choose 0, 2, 4, 6, 8 or 10. With a step of 1, they can choose any whole number from 0 to 10.
Can I download all learners' forms at once?
Yes. In “Analyze”, click “Select”, tick all learners, then click “Download documents”: you get a ZIP file. For a table of all answers, use “Results” instead (see Retrieve answers).
Are the module authors notified when a learner submits the form?
No, not by default. No email is sent to authors, even if “Have the form emailed automatically” is enabled without a recipient. To be notified, enter your address (or the trainer's) in “Email recipient(s)”. Otherwise, check the answers in the “Analyze” tab.
Why can't sliders be mandatory?
A slider always has a default value. If the learner doesn't move it, that value is saved: an answer always exists, so the “Mandatory” option isn't needed.