
Manage your learners efficiently and assign them activities in Teach Up. This guide explains how to navigate these features.
Table of content
- Access the learner management tab
- Add new learners
- Manage learners by groups
- Remove a learner
- View learner count
- Export learners
- Frequently Asked Questions
This feature is available for accounts under the Platform subscription.
Interested in creating learners via the API? See this article.
Access the learner management tab
Navigate to the "Learners"  tab located in the navigation bar of your studio.
Add New Learners
Administrators and department managers can add learners. Authors don't have access to the "Learners" tab.
Add Learners Manually
To add learners manually, follow these steps:
- Access the "Learners" tab.
- Click "+ New".
- Enter the email address(es) of the learners to be added.
- Click "Confirm".
Add Learners in Bulk
To import multiple learners at once, follow these steps:
- Access the "Learners" tab.
- Click "+ New".
- Copy the email addresses from an Excel or CSV file.
- Paste them into the "Email(s)" field (separated by commas or line breaks).
- Select "Confirm".
 Click on the image to open it in a new tab

⚠️ Adding learners does not trigger account creation emails.
Learners will be able to create their accounts later, either through the direct access link or when they are assigned to a new activity.
Manage Learners by Groups
Create learner groups to simplify the assignment of courses, training paths, or assessments. These groups also allow you to sort learners into cohorts.
Create a Group
Only administrators can create, edit or delete groups. Department managers can assign learners to existing groups (see below).
To create a new group, follow these steps:
- Access the "Learners" tab.
- Click the "Manage groups" icon
 .
- Click the "Create a group" button.
- Select a color associated with your group.
- Add a group title.
- Click "Confirm".
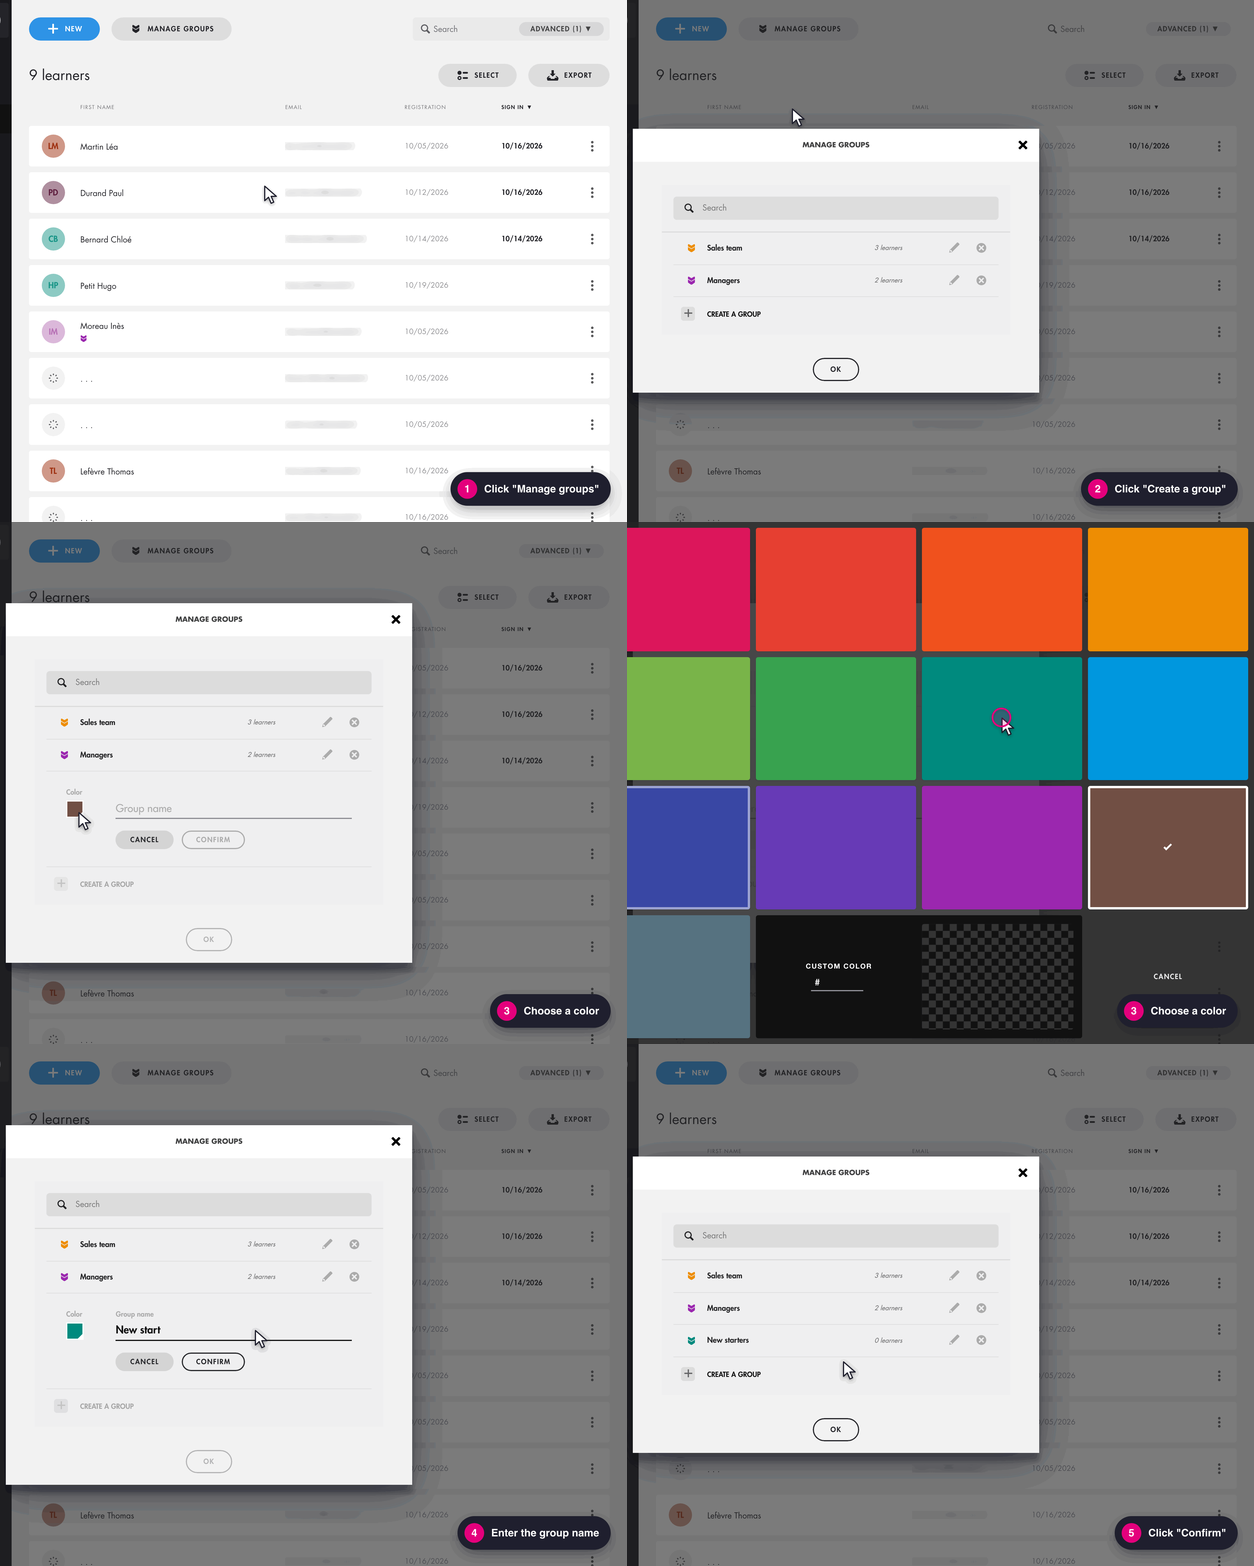
Click on the image to open it in a new tab.
Assign a Learner to One or More Groups
Administrators and department managers can assign a learner to one or more existing groups. To do so, follow these steps:
- Select the learner.
- Click the three dots and choose "Select groups" .
- Choose the group(s) to assign to the learner.
- Click "Confirm".
To remove the learner from a group, untick that group in the same window, then click "Confirm".
Assign Several Learners to a Group at Once
Administrators and department managers can assign several learners to one or more groups at once. To do so, follow these steps:
- In the "Learners" tab, click "Select".
- Tick the learners to assign (1).
- Click the "Select groups" icon at the top right of the list (2).
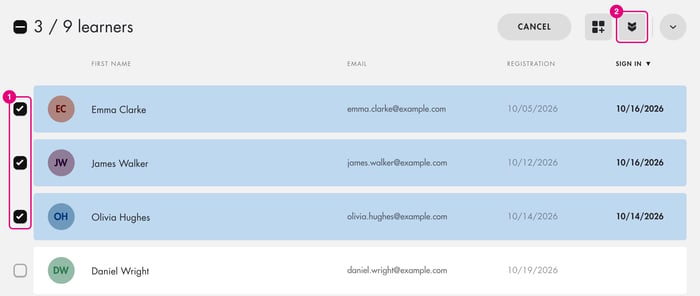
Click on the image to open it in a new tab.
- In the "Assign groups" window, tick the group(s) (1). Administrators can also create a new group there with "Create a group".
- Click "Confirm" (2).
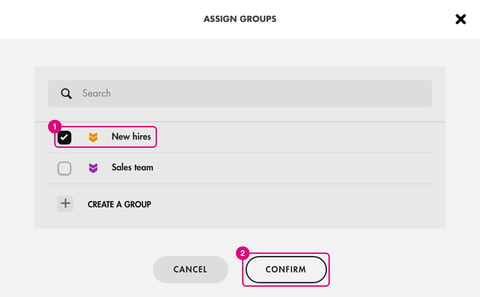
Click on the image to open it in a new tab.
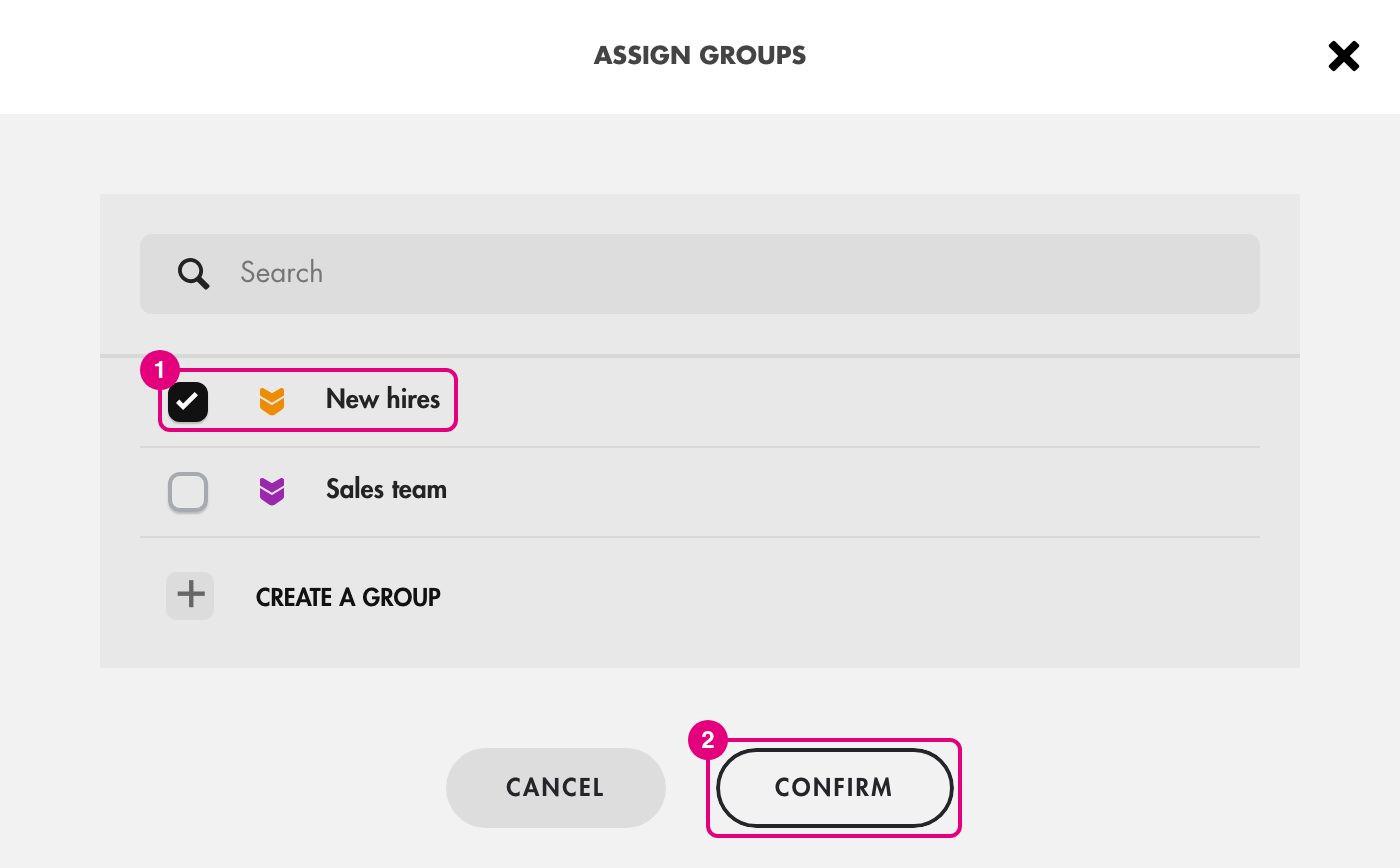
The ticked groups are added to the groups learners already belong to: learners are not removed from their other groups.
A box marked with a dash (–) shows a group that only some of the selected learners already belong to. If you leave it as it is, nothing changes for that group.
Remove a Learner
To remove a learner, follow these steps:
- Access the "Learners" tab.
- Search for the learner to be removed.
- Click "Exclude learner"
 next to their name.
At this stage, the learner will still be counted in the total learner count, but they will be grayed out and no longer have access to the platform.
To delete them completely, click the three dots  again and select "Delete forever" .
Deleting a learner forever does not free up a learner licence: once used, it remains counted until the end of the subscription period. Only author licences can be freed up (see Understand and track my subscription).
View Learner Count
The learner count resets with each contract renewal (typically annually). Unused seats do not roll over to the next subscription year.
Export Learners
To export the list of learners:
- Access the "Learners" tab.
- Select "Export"
 .
- Choose the export format (CSV, Excel, etc.).
- Click "Download" to retrieve the file.
👉 For more details on the content of the exports, see this article.
Frequently Asked Questions
How to add learners by importing an Excel (XLSX) or CSV file?
Currently, it is not possible to import learners via an Excel or CSV file. However, you can copy/paste a list of email addresses separated by commas or line breaks.
Can I modify the email address of an existing learner?
Yes, our support team can replace the old address with the new one. The account stays the same: the courses the learner has completed are kept.
This is only possible if the new address has never been used on Teach Up. If an account already exists with the new address, the history of the old account cannot be transferred to it.
To request the change, write to support@teachup.com with:
- the current email address;
- the new email address.
How to re-include an excluded learner?
To re-include an excluded learner, follow these steps:
- From the learner list, click "Advanced".
- In the "State" tab, open the dropdown list.
- Select the "Excluded" filter only, then click "OK".
- Click "Apply" to display the list of excluded learners.
- Next to the learner, click the three dots, then select "Include again".
What is the impact of excluding a learner?
When a learner is excluded, they can no longer access the Teach Up platform. However, all their data, such as assignment history, progress, and results, are retained. The data remains visible in the activity dashboard.
Here is the interface displayed when an excluded learner attempts to access Teach Up: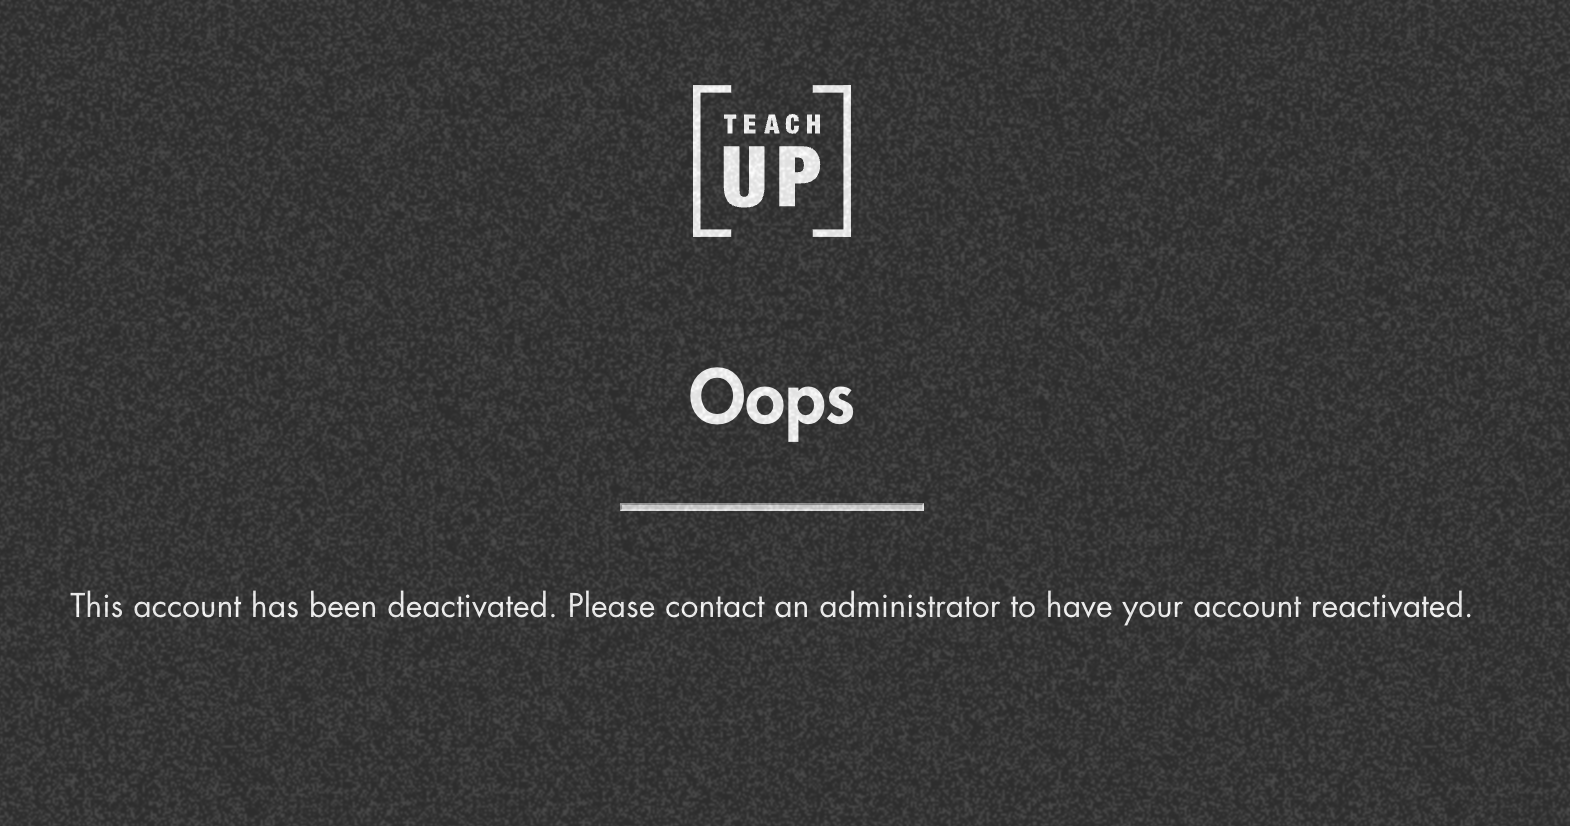
I added a learner, but I can't find them in the list. What should I do?
If you're unable to find an added learner, first check if they are listed among the excluded learners. If not, contact our support team.
To re-include an excluded learner, follow the steps in “How to re-include an excluded learner?” above.
I can't add a new learner or author. What should I do?
If you can't find a learner or author you added, first check whether they appear in the list of excluded learners.
How can I change my learners’ first and last names?
Currently, it is not possible to manually edit a learner’s first and last names from the Teach Up Studio.
These details can only be updated by learners themselves from their learner space: https://app.teachup.com/learner.
If the first and last name fields are not visible, it means the learner has not yet created their Teach Up account. These details are requested before the account creation process is completed.
Can a department manager assign learners to groups?
Yes. They can assign learners to existing groups with "Select groups", one at a time or several at once, and remove a learner from a group. However, they cannot create, edit or delete groups: only administrators see "Create a group". See The different roles on Teach Up.